
Diving Into NFTs – How To Purchase Horse On Zed Run

Welcome back to the Tribe! Today we are going to continue our series on the fast growing, and well funded platform Zed Run!
In this post we are specifically going to help new users learn how to Purchase Horse On Zed Run! We will take you through the process from start to finish. Here is what we will be covering:
- Moving funds from fiat to crypto using Coinbase
- Setting up a MetaMask
- Converting your Ethereum to the Polygon Matic network Ether
- Setting up Opensea
- Placing a bid or buying NFTs
- Using your new NFT horse on the Zed Run platform
With a full line-up, lets dive straight into it by setting up a Coinbase account.
Nothing should be considered investment or financial advice. Enjoy the ride!
Setting Up Coinbase

The first step in purchasing your Zed Run horse is by converting your fiat (dollars) into crypto (Ethereum).
The most trusted and user friendly way to do so is on Coinbase!
If you have been around the crypto scene then more than likely you are familiar with the platform. Although, if you are new it might take you a little while to get this squared away.
To get setup on Coinbase, you will need to create an account. In the process of doing so, you will be required to verify your email, verify your phone number, verify your identity and provide a method of payment. This payment method is typically a debit card, credit card or by linking your bank account.
While linking your bank account might sound scary, it is very normal and secure. In addition, by linking your bank account you can withdraw and deposit without additional fees on the Coinbase platform later on!
This process if fairly easy, but could take up to a week or two if there are any issues with verification. Here is the link for the step-by-step method, but for the most part just follow the prompts on setting up your account and you should be fine.
Once you have your account setup, you will need to deposit funds and purchase Ethereum (ETH). Make sure to purchase Ethereum and not Ethereum Classic or any other crypto. You need Ethereum specifically for purchasing a Zed Run horse.
Once your Ethereum has been deposited and cleared for transfer (this could take a few days to process as well) we are going to move it off the platform to your MetaMask wallet. Therefore, lets go and set that up in the next step!
Setting Up Metamask
Now that you own crypto (ETH), you are going to need to send it to a usable wallet that is integrated with your web browser. That wallet is called MetaMask!
MetaMask is a software that allows you to interact with the Ethereum blockchain directly. Users can access their Ethereum wallet through the native MetaMask browser extension and interact with decentralized applications on the web. Cool huh.
To setup a MetaMask you will need to:
- Go to the link in the “MetaMask” name above
- Click the download button
- Go through all of the steps and accept any changes to your computer
- Create a log in with a password
- Open up the extension in the top right of your browser and Voilà!
Once your MetaMask is setup, click the top part of the interface that has your account name and wallet address. Copy the address and go back to Coinbase.
Once back on Coinbase, you are going to send your Ethereum to the MetaMask address by:
- Clicking Send/Receive in the top right of your account home page
- Change “pay with” to Ethereum
- Put your MetaMask address in the “to” section. We got this in the step above where we copied the wallet address from the MetaMask browser extension
- Enter in the amount you would like to send at the top
- Click continue and approve the transaction!
Unfortunately, you will be charged a small fee in gas for moving your Ethereum, which you might want to factor into your total input amount.
Afterward, you can track the transaction on EtherScan while your funds move. Once they arrive in the MetaMask wallet (after around 10 minutes), you are finished with step 2!
The next step in the process is converting your Ethereum from MetaMask to Ether (PoS-WETH) on the Matic Polygon Wallet!
Setting Up Polygon Wallet

If you’ve made it this far, congrats you are almost ready to purchase your first NFT! In this step, we are going to setup your Polygon Wallet.
All your are going to need to do is:
- Go to the above link on “Polygon Wallet”
- Next you should be prompted by a screen that looks like this:
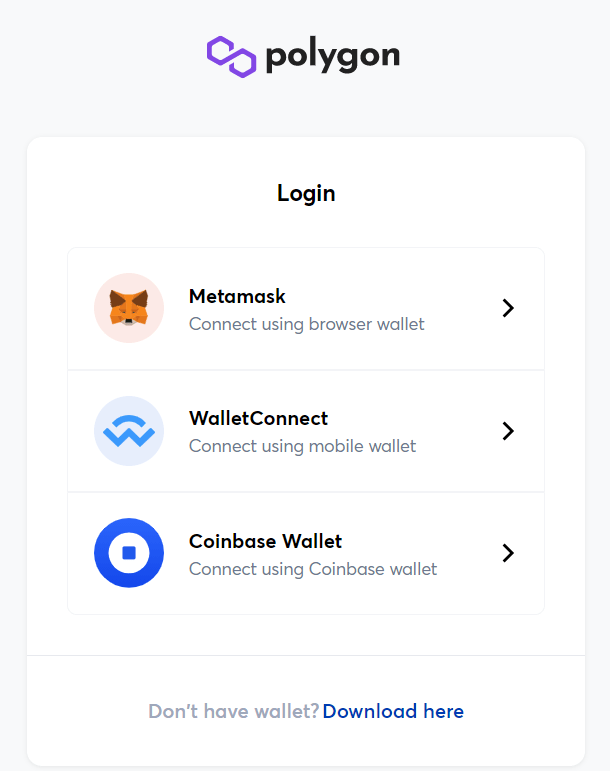
- Choose MetaMask and go through the steps to connect your wallet. You will probably be prompted to sign something in your MetaMask interface. Go ahead and do that to approve connecting your wallets together
- Once you have connected your wallet, you need to click a button that says “Move funds from Ethereum to Polygon” on the landing screen of your Polygon wallet. It should be right under the receive and send buttons.
- Once you select this button, you will be taken to a new screen that allows you to enter in the amount of Ethereum you would like to transfer. It should look like this:
 Unfortunately, you will be charged gas fees once again for this, but this is the final time!
 - Select transfer at the bottom, and within 10 minutes you should see your Ether (PoS-WETH) balance populate with the amount of Eth you sent over minus the gas fees!
Congrats! You are now ready to purchase your first Zed Run horse!
Now, we head over to the second-hand market place to find a horse – Opeansea.
Buying NFTs On Opensea

The second-hand market place where you can purchase Zed Run horses is called Opensea.io!
Opensea is just as it sounds, a marketplace for NFTs! There are all kinds of NFTs that can be found on this platform, but in this post we are only looking to buy those special horses that can be used on the Zed Run platform.
In order to find them, you can go to this link here or simply type in “Zed Run” into the search bar on Opensea and click enter! You should see a page similar to this:

Here we can see thousands of horses for sell, BUT we still need to connect our funds to the Opensea platform. Don’t worry, this is extremely easy.
Connect MetaMask to Opensea
- Click the wallet icon in the top right
- Once it pops out select MetaMask
- Go through the steps to connect it and sign the prompt
If you are successful, you should see your Eth (Polygon) balance that you can use to purchase any horse or NFT on the platform!
Opensea Purchasing
Now that you have your funds, you have two options:
- Purchasing a horse outright
- Placing a bid on a horse
You can see what horses are for sell outright by the “price” indicator underneath their picture on the Zed Run listings.
Please note that all of the prices will be in Ethereum, but if you would like to see their dollar amount, then click on the picture and a new page will open up. On the page specifically for that horse will be:
- Information on the NFT (bloodline, gender, breed type, coat color, etc)
- Price of the horse for sell in dollars and in Ethereum
- Bids that have been placed
- Trading history for the NFT
- Information on who owns it, who created it, and so much more
Some of this information can be very useful in finding an NFT owner and negotiating a price if you choose to buy one.
Although, If you are ready to buy the horse then simply click “Buy Now” and sign the pop-up from MetaMask. Within a few minutes the horse will be in your Opensea account!
It is also important to know that you can place bids on ANYTHING on the Opensea platform EVEN if it is not for sell. For those reasons, you can place bids on your favorite horse even if the owner is not currently selling it.
Although, when you place a bid for a horse you will need to sign a pop-up from your MetaMask interface, select a timeframe for the bid to be available, and then let your funds be “held” for the term of the bid.
Once you have purchased a horse, the next step is to setup your stable on Zed Run to use it!
Setting Up Zed Run Stable

The last and easiest part to this process is setting up your Zed Run Stable!
- Click on the link right above this to go to the Zed Run platform
- In the top right you are going to want to click the big green button “Start”
- Once prompted, select MetaMask once again (I know this is like the 5th time)
- Go through the process and sign any pop-ups to approve Zed Run Connecting to your wallet
- And bam! In a few minutes you should see your horses in your profile -> My Stable
Now that your horse or horses are on the platform you have a few choices:
- Look for a race under Racing -> Events. Then find a class to race your horse in that suits it’s ability
- Go to your stable and select your horse to be put up for Stud. This is breeding to get free income! (Only for Stallions and Colts – male horses)
- Or go to Breeding and find a suitable male horse to breed with your female horse! (Filly or mare)
Either way, there is plenty to do on the platform.
A quick note would be that males can breed up to 3 times a month, and females can breed only once. Although, the female horse owners get to keep the offspring. The male horse owners are compensate for the Stud fee they bring in for breeding which can be viewed as passive income!
Purchase Horse On Zed Run
Thanks for reading this educational post on how to purchase horse on Zed Run!
We hope you are now setup to use your horse and fully experience the platform! If you want more tips on Zed Run, then be on the lookout for some of our other posts that will help you make money and succeed on the platform!
Cheers


Trackbacks & Pingbacks
[…] studying about the platform and watching some videos, I decided to buy a z10 Buterin off Opensea to get started. I was early enough to try and buy horses on the drop, but sadly I was not […]
[…] allows users to utilize NFTs in a new and evolutional way. Not just any NFTs, but the native horse NFTs that can be bought on Opensea. These horses can be moved to the platform and used […]
[…] with learning all of the basics of the platform, there are several steps just to get your Ethereum converted and usable on the platform which might scare many new users away. In addition, racing can be viewed as gambling and it is very […]
[…] How to purchase horses from start to finish […]
Comments are closed.